'http-equiv="refresh"content="5;URL='https://www.jackiesinklings.blogspot.com'"" ? "width=device-width,initial-scale=1.0,minimum-scale=1.0,maximum-scale=1.0" : "width=1100"' name='viewport'/> Home: October 2013

Wednesday, October 30, 2013

Challenge #65- Whimsy Stamps - Anything Goes

 It's time for Whimsy monthly Digital Challenge, unfortunately I needed  an inspirational post last Friday so  didn't have time to do another card so I'm showcasing "Isla" by Marika Collins Collection again which you can find it here.

I started off using Chocolate Chip for my base which is a 5"x 7" finished card size. I then used Basic Grey collection called 'Stella Ruby' for the rest. I added 2 layers before cutting out a frame using Spellbinders die called 'Majestic Labels 25'. I then cut out another frame using light green glitter paper using another Spellbinders die called 'Ornate Artisan Tags & Accents. I printed the girl out using shimmery white paper and colored her using Prismcolor pencils. I printed out a sentiment using Whimsy Sentiments 2 and sponged on red, light green and brown Fluid Chalk along the edges. I used a tag from the same collection which I added the sentiment on top using pop up dots. I added some sheer ribbon along with a brown button with some green hemp twine. I added 2 Little Whimsies flower resin by Webster's Pages. 
Thanks for stopping by!
Our topic this week is

Anything Goes


Remember, you don't have to use a Whimsy image on your challenge creation,


although it would be great if you did!


Also, your entry doesn't have to be a card - we welcome all paper projects!

Our Prizes this month are:

First Winner


Second Winner


Third Winner


A mystery Whimsy Stamps rubber stamp


Don't forget ...as well as random winners being chosen each challenge, one lucky player who has used a Whimsy Stamps image (rubber or digital) will have the opportunity to be a guest designer for a future challenge. If you have used a Whimsy Image and would like to be a future guest, please add GDT to your name when entering. The guest designer will be able to choose a digi stamp of their choice from the store to create their guest card too!


Anyone can enter our challenge and we don't mind you combining with other challenges either! Please remember no more than 3 entries per challenge and all we ask is that you add a link in your blog post to tell your friends you entered the Whimsy Inspirations Challenge

Don't Worry if you don't have a blog but would still like to enter just email debbie at eastmandeborah@rocketmail.com with a picture of your card and It will be add it for you. 

Tuesday, October 29, 2013

Extra! Extra! I have been Published


Last February while I was still  designing for Sparkle N Sprinkle Design Team, we were given the opportunity to design some cards for CardMaker Magazine which featured different ways to use color. I had made 3 cards and only this one made publication. Here is the card in the gallery at Sparkle N Sprinkle.

This technique was based on a technique that Els from Elizabeth Craft Designs did, using her Peel- Offs, glitter and Copic markers. So I decided to see if it would work using stamps, glitter and Tim Holtz Alcohol Inks.  So I started off using Early Espresso paper for my base which is a 5"x 7" finished card size.


Supplies Needed:

Cardstock:  Shimmery White (#101910), Early Espresso (#119686), 
                        Window Sheets (#114323) all by Stampin'Up

Printed Papers   (Bo Bunny C'est La Vie Collection Pack #13816605)

Stamps: Like A Butterfly 3545- 437 A; 
                  Swirl Butterfly LG 3544- 437 H,            
                  Small Swirl Butterfly 3550 - 437A}  
                  Fancy Butterflies 437 by Sparkle N Sprinkle
           
Ink: Black Pigment ink, Chestnut Roan, Blue Lagoon, 
          Blue Iris Fluid Chalk by Clearsnap, 
           Black Stazon #99704- Sparkle N Sprinkle
Ribbon: 1 /2"Seam Binding Ribbon - Baja Breeze #122331
                  by Stampin'Up
Pearls: Kaisercraft Pearls - Bliss # SB718
Dies: Memory Box Die 'Tiffany Frame' #98401
Adhesives: Super Adhesive Sheets # SAS02,
                      1/2" Double sided Tear-ific Tape #SAT04
                      all by   Sparkle N Sprinkle
Other: Tim Holtz Alcohol inks- Stream #Tim22206, Pool #TAB25504,
              Tim Holtz Alcohol Applicator #TIM20745,
              Tim Holtz Blending Solution    #TIM19800
             Cloud Nine Velvet Glitter # GM2000, Fiery Brown EP 369S, 
              all by Sparkle N Sprinkle,
              Darcie Embossing Folder - Butterflies in Corner #1216-64,
              Spellbinders Gold Label Four SKU: S5-159

  
Instructions: 5"x 7" finished size
1. Cut Early Espresso paper to a finish size of 5"x 7". Cut Stripe paper and  brown paper incrementally. Wrap ribbon around panel and adhere to card base as shown along with bow.
2. Take music paper and run thru butterfly in corner embossing folder, adhere to card base. Sponge blue and brown inks over the embossed area.
3.Die cut blue paper using Memory box die called 'Tiffany Frame'.  Stamp sentiment using black pigment ink and emboss using Fiery Brown Embossing Powder.  Adhere to card with double sided tape.
4. Stamp Swirl Butterfly onto acetate using black stazon. Adhere Super Adhesive Sheets to backside of image. Cut out image, apply Cloud Nine Velvet glitter to adhesive sheet. Burnish well.
5. Take Alcohol inks and apply directly to glitter. Take alcohol applicator to dilute the inks (if too dark) use blending solution to lighten.
6. Attach pearls as shown.


Designer’s Tip:  (You can change colors to suit your color palette)


Friday, October 25, 2013

Inspirational Post for Whimsy Stamps!

Well it's another warm day for Oct 25th, which I will take any day. Here is another inspirational card for Whimsy Digital Stamps using "Isla" by Marika Collins Collection which you can find it here

I started off using Chocolate Chip for my base which is a 5"x 7" finished card size. I then used Basic Grey collection called 'Stella Ruby' for the rest. I added 2 layers before cutting out a frame using Spellbinders die called 'Majestic Labels 25'. I then cut out another frame using light green glitter paper using another Spellbinders die called 'Ornate Artisan Tags & Accents. I printed the girl out using shimmery white paper and colored her using Prismcolor pencils. I printed out a sentiment using Whimsy Sentiments 2 and sponged on red, light green and brown Fluid Chalk along the edges. I used a tag from the same collection which I added the sentiment on top using pop up dots. I added some sheer ribbon along with a brown button with some green hemp twine. I added 2 Little Whimsies flower resin by Webster's Pages.

Saturday, October 19, 2013

Inspirational Post for Whimsy Stamps

Well I'm back with another inspirational post for Whimsy Stamps using this adorable image by Crissy Digi's called "The Infant King" which you can find here in the store. The idea of my card was to mimicked a stable with the Star of Bethlehem showing the way to the new King.
I started off using Early Espresso for my base which is a 5"x 7" finished card size. I then used My Mind's Eye "All is Bright" for the rest. I added 3 layers before cutting out the 4 layer using Tim Holtz die called 'Vintage Cabinet Card'. I then ran it thru Tim Holtz Texture Fade called 'Wood Planks'. I then highlighted the texture using Chestnut Roan Fluid Chalk. I also cut out the roof using another Tim Holtz die called 'Pediments' and again ran it thru the same texture fade. I then printed The Infant King onto shimmery white paper and coloured it using Prismacolor pencils. I add some white glitter flocking to the lamb and the Angel's wings. Then added some gold glitter to her halo. I then cut out a fence using Cottage Cutz die using white metallic paper. I added some Baja Breeze seam binding along with a sticker from the All Bright Collection. I then cut out a star using Spellbinders die called 'Holiday Tags' using gold metallic stripe paper.

Star of Bethlehem 

Monday, October 7, 2013

Flourishes Timeless Tuesday #240 ~ Paper Piecing & A Special Contest!

We have something extra special for this Timeless Tuesday Challenge.  If you play along, not only will you get a chance to win our weekly prize drawing, you might get a chance to be one of  our Flourishes’ Guest Designers for December!  HOORAY!
FTTC240 Paper Piecing


So here is my card for this week's challenge, I used the Poinsettia & Pine stamp by Flourishes. I stamped the Poinsettia 4 times and colored parts of the Poinsettia where I wanted to add dimension. Here is a picture of the Poinsettia showing the dimension. 


The Poinsettia was popped up 3 times and so were the Holly berries which were popped up once. I also added some Glossy Accents onto the berries. I also cut out the frame using Spellbinders 'Label 25' die.


Now if you really liked my card, please go and vote for me here !!!  
I want to be a Guest Designer for  Timeless Tuesday Challenge for the month of December.


Wednesday, October 2, 2013

Challenge #64- Whimsy Stamps - Shabby Chic / Vintage

Well I'm back with another card for this month's challenge at Whimsy Stamps.
This month's theme is Shabby Chic / Vintage.
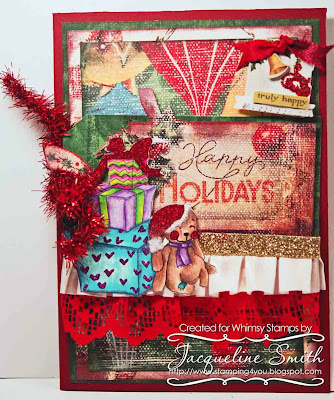
I started off using Cherry Cobbler for my base which is a 5"x 7" finish card size. I then used Daisy D Vintage Christmas line for the rest. I added 3 layers and then a cut out a tag using a Tim Holtz die called 'Tag & Tie' using green paper. I then cut out the holiday tag using Christmas Tag paper by Daisy D. I printed out 'Christmas Bunny' by Lia Stampz onto shimmery white paper and colored her using my Prismacolor pencils. I also added some glitter to the bow, her hat and her cheeks to give her some color. I added some red vintage lace which I then layered on some cream ruffle ribbon and added on top some gold glitter tape. I found some old red tinsel ribbon by My Mind's Eye  and added to the tag. Also used a Vintage  sticker from My Mind's Eye too.


Our topic this week is

Shabby Chic/ Vintage


Remember, you don't have to use a Whimsy image on your challenge creation,


although it would be great if you did!


Also, your entry doesn't have to be a card - we welcome all paper projects!

Our Prizes this month are:

First Winner


Second Winner


Third Winner


A mystery Whimsy Stamps rubber stamp


Don't forget ...as well as random winners being chosen each challenge, one lucky player who has used a Whimsy Stamps image (rubber or digital) will have the opportunity to be a guest designer for a future challenge. If you have used a Whimsy Image and would like to be a future guest, please add GDT to your name when entering. The guest designer will be able to choose a digi stamp of their choice from the store to create their guest card too!


Anyone can enter our challenge and we don't mind you combining with other challenges either! Please remember no more than 3 entries per challenge and all we ask is that you add a link in your blog post to tell your friends you entered the Whimsy Inspirations Challenge

Don't Worry if you don't have a blog but would still like to enter just email debbie at eastmandeborah@rocketmail.com with a picture of your card and It will be add it for you. 


Tuesday, October 1, 2013

Whimsy Stamps October New Digital Release


 Welcome to the October digital release blog hop!!

We have lots of new images to share with you today created by


So here is my card for this month's hop and I used Miss Rach Digis called 'Halloween Party Spider and you can in the store. I started off using metallic purple paper which is a 5"x 7" finished card size. I then used Graphic 45 collection called 'Happy Haunting'. I added 3 layers and then cut out spider web using Tim Holtz die called 'Cobwebs' using orange metallic paper. I cut them in half and used them on each corner and one for the spider to rest on. I then added some black and silver glitter onto the cobwebs. I then printed out spider onto shimmery white paper and colored him using Prismacolor pencils. I then decided to add some black flocking and  added some black and silver glitter for highlights. I also added some flocking to the pompom and on the trim of the hat. I added some chipboard piece which I took out the centre and added a sentiment from the paper collection.

All Whimsy Stamps digital images are 300dpi for high print quality.You can re-size, flip, or rotate to fit your own project
  To find all of today's new releases please visit the Whimsy Stamps Store
Don't forget to leave comments along the way as there will be 2 mystery DT Members who will each be choosing a winner from the comments left on their hop posts!

These winners will each win a Whimsy digital image of their choice.

The Grand Prize winner of the hop will be chosen from the very last stop, which is Michelle Oatman's
Blog

 This winner will receive 5 digital stamps of their choice from the

The hop will run for 1 week and end on Sunday 8th September at 12 Noon EST, when the lucky winners will be announced right here.


Below is a complete list of the hop in case you get lost along the way